Starting an online store has never been easier and cheaper, thanks to platforms like Shopify. With its user-friendly interface, easy-to-use tools, and extensive range of features, Shopify has become a popular choice for aspiring entrepreneurs.
However, the cost of setting up a Shopify store can be a major hurdle for some. Fortunately, there are ways to get started for free, or almost free.
In this article, I will show you how to start a Shopify store without breaking the bank. Whether you’re a seasoned pro entrepreneur or just getting started, read on to learn how to launch your own online store for free.
Table of Contents
Step 1: Sign Up for a Shopify Free Trial
Shopify offers a 3-day free trial without requiring credit card details. After that, you can continue using the store at just $1/month for 3 months.
So, to get started go to Shopify.com, enter your email address, and click on the “Start free trial” button.
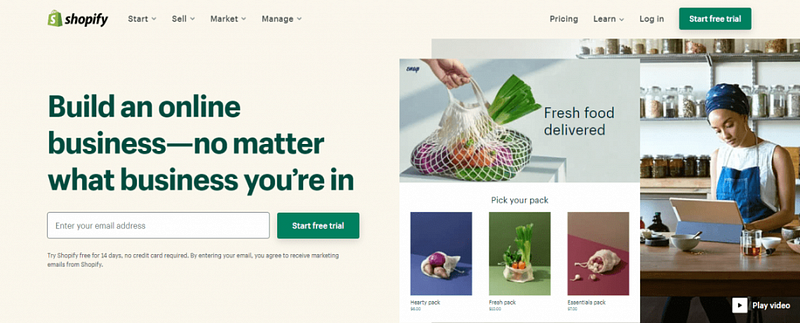
Next, fill out the form with your email address, password, and store name. Your store name needs to be unique, i.e., there must not be another store with the same name on the Shopify platform.
Once you’ve entered the available store name, click the “Create your store” button.
Now, Shopify will ask for information about you & your business. Fill up the field respectively & click Next. You can skip this step as well.
Afterward, add business details like address and name and click the “Enter my Store” button.
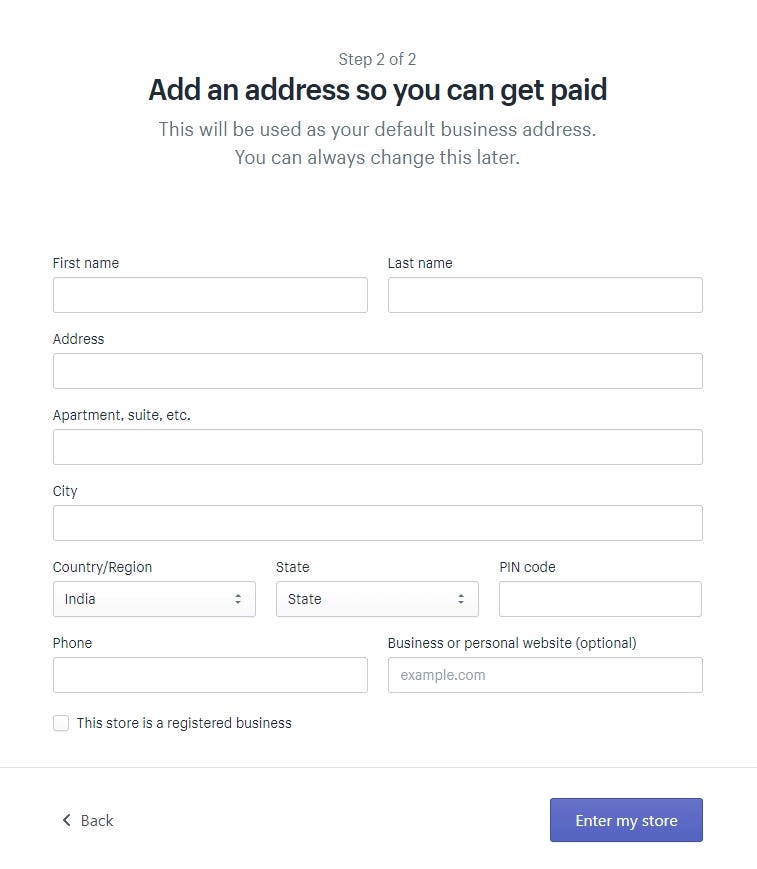
Congratulations! You are now inside your Shopify admin panel.
Click here to start your 3-day free trial if you haven’t tried Shopify yet.
Step 2: Choose A Shopify Theme for Your Store
Once you’re inside your store admin panel, it is time to beautify your store.
To get started, you need to choose a theme for your store. Shopify has its own official theme store where you can find both free and premium themes.
Every theme comes with its limitations in customization. That’s why while selecting the theme, ensure you go through the functionality details.
Find a theme
To find a theme for your store, click on “Online Store” in the left sidebar. Then, click on “Themes”
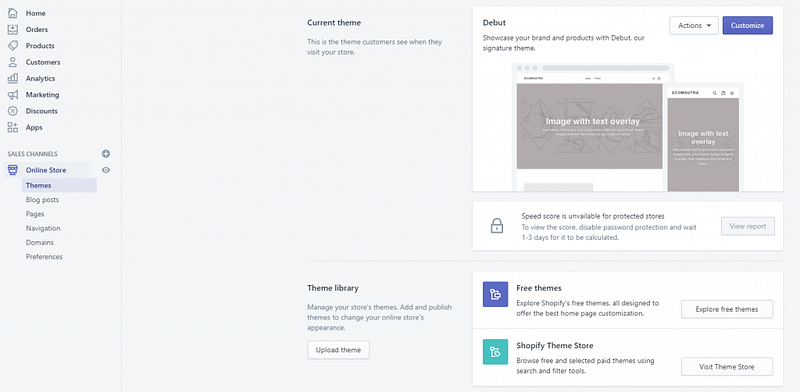
Here you can also upload a theme you purchased from theme marketplaces like Boostertheme. Or, you can explore the Shopify theme store, where you’ll find 70+ themes in various categories with different functionalities.
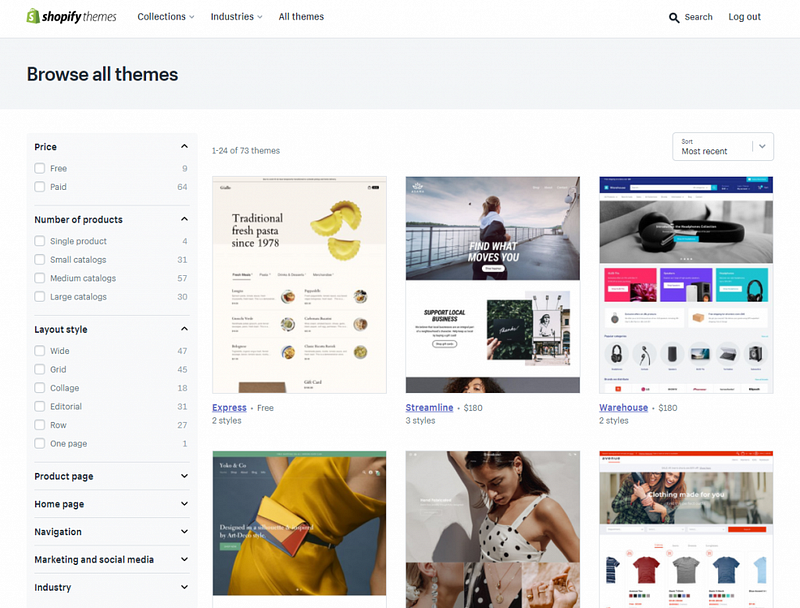
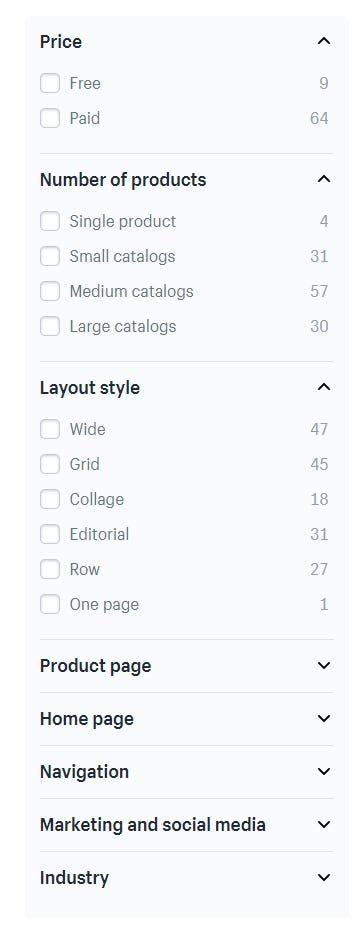
You can filter themes based on various attributes like the number of products, layout style, marketing features, industry, etc. You can also sort themes by price, popularity & most recent.
Analyze the features of themes.
While going through all the themes, find out more about the features of the themes you like — like mobile responsiveness, SEO, pop-ups, etc.
To find this information, click on the theme you liked, and you’ll be directed to the page where you’ll be given more information about the theme, including features, reviews & the stores that use that specific theme.
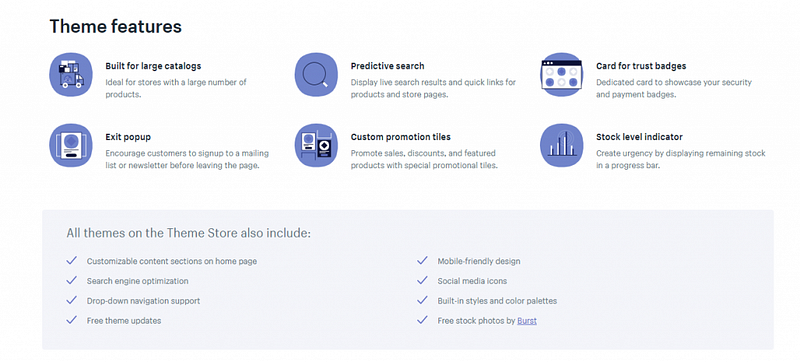
You can scroll down to view more themes with similar features by the same designer.
Step 3: Pick Your Domain Name
Your domain name is how your customers will find you online, so it’s important to choose one that is easy to remember and represents your brand well.
To set up your domain, simply click on the “Add domain” button from the right sidebar.
(You can also find the Domain section by navigating to Settings > Domains from the Shopify admin area.)
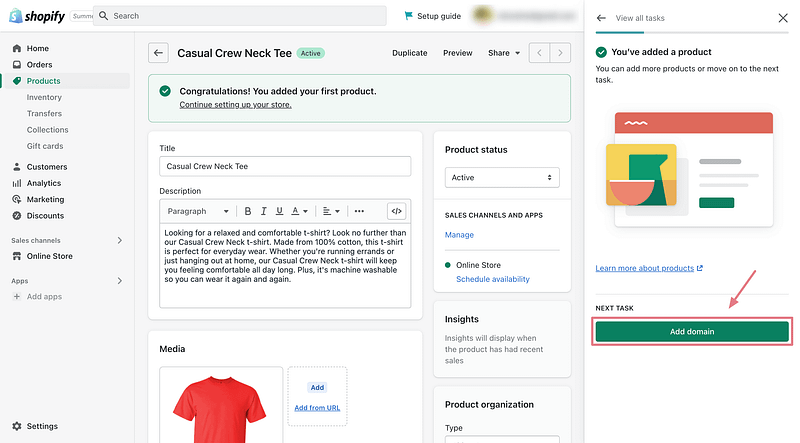
By default, Shopify gives you a subdomain (yourname.shopify.com) but you can also register a custom domain name (www.example.com).
Shopify makes it easy to register a custom domain name for your new online store. Click “Buy a new domain” and follow this simple guide on Shopify.
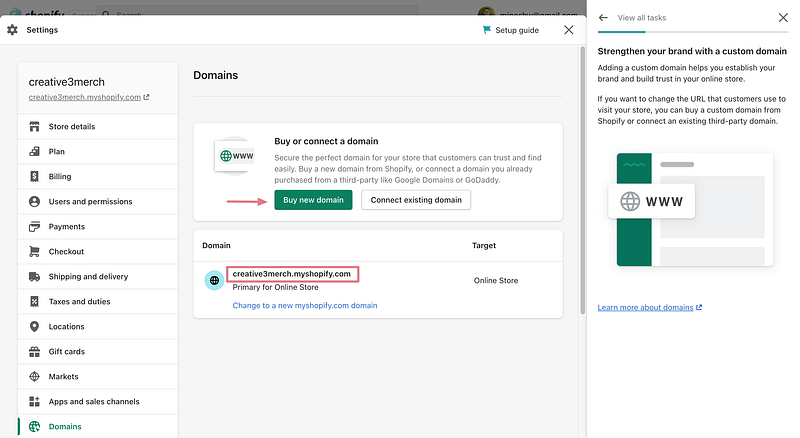
If you already have a domain name registered with a 3rd party provider like Namecheap, you can also connect it to your Shopify store.
Step 4: Add your first product
The first thing that you will see when you land on the dashboard is a button that allows you to add a new product. This is just another reminder that Shopify is entirely focused on creating online stores.
Instead of giving you themes and colors to work with, it focuses on managing your products the first time you log in. And that’s ok! After all, you are creating an online store, not a blog.
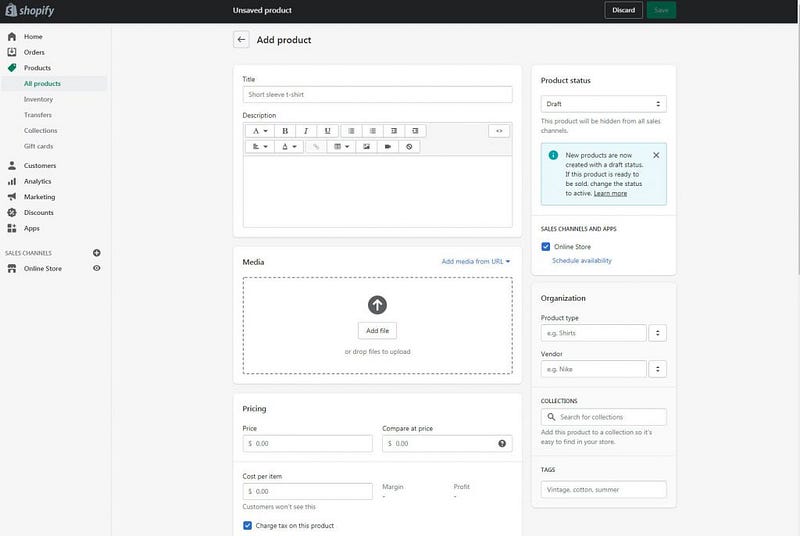
To start, click on the “Add Product” button. A neat-looking and straightforward editor will appear that will let you enter the details about your first product. This is where you write the product title and descriptions, add media files, set pricing, add SKU and barcodes, and everything else you may need to sell your first product online.
Don’t forget to take a look at the right-hand side of the screen where you can add tags, choose product types, enter vendors, and more.
Once you’re ready to publish your first product, go to the top right corner of the screen where you can change its status from draft to active.
Believe it or not, that’s all you need to do to add your first product!
Step 5: Set Up Payment Methods
Great work! You’re almost ready to welcome the first customers to your Shopify store.
The only thing left to make your Shopify store sales-ready is setting up your payment gateways and the shipping and taxes settings.
A payment gateway is a service that allows you to accept payments online. When a customer wants to make a purchase on your Shopify store, you need to make sure you have a payment gateway set up so they can complete the payment.
There are multiple payment gateways out there that you could use for your Shopify store. When picking one, it’s important to consider the following:
- If your store’s business model is accepted (some payment gateways don’t support dropshipping stores).
- Whether it works with the country and currency of your target audience.
- The transaction fees.
- The customer service.
Step 5: Customize Your Online Store
You don’t need to be a web design expert to have a beautiful and professional online store. Shopify makes it easy to customize your current theme to match your brand and style.
To start customizing, go to Online store > Themes, and click on “Customize.”
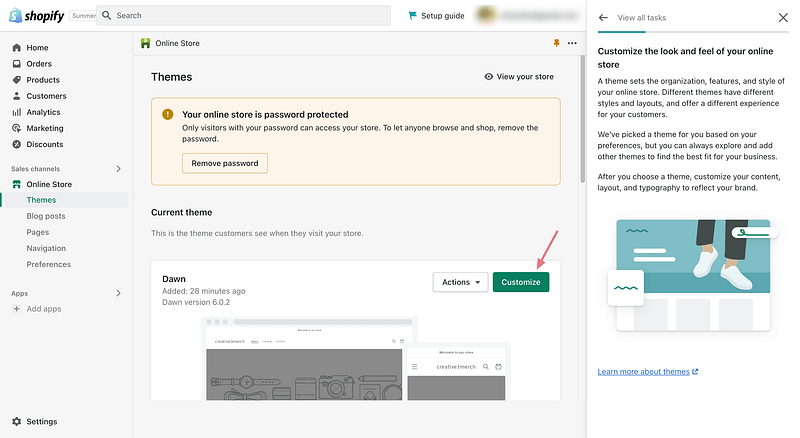
After that, you’ll be able to edit the look and feel of your website, super easily.
By taking a few minutes to play around with the settings and options, you can ensure that your store looks exactly the way you want it to and functions perfectly for your customers.
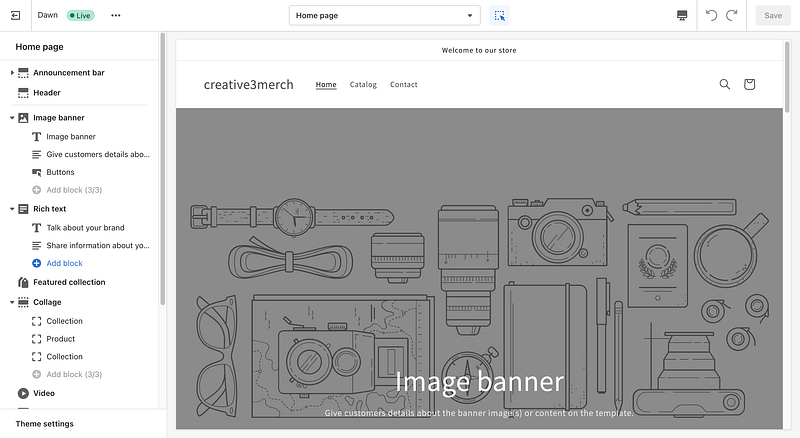
You can also choose a different theme for your Shopify store.
There are a variety of themes available, so take some time to browse through them all until you find the perfect one for your store.
Next, you’ll want to add custom logos and images to help represent your brand in your store.
You can upload these directly into Shopify, or you can use a tool like Tailor Brands or Canva to create them.
Apart from the theme customizer, you may also need to pay attention to the following settings under the Online store section in order to keep your store running smoothly:
- Blog posts: A blog post is simply an article that is published on your Shopify store. Shopify has built-in blogging tools so you can reach out to your customers and share valuable information about your business.
- Pages: At a minimum, your Shopify store should have About Us, Contact Us, Privacy Policy, and Terms of Use pages. Once you’ve created your pages, be sure to keep them up-to-date so that they continue to protect you and your customers. To generate legal pages, you can use Shopify’s privacy policy generator.
- Navigation: This helps you manage menus or link lists to help your customers navigate around your online store easily.
- Preferences: This section has all the settings related to SEO, Social sharing, cookie, and other tracking options.
If you just don’t have the time to do all of these yourself, you can hire a Shopify expert to help you build or redesign your Shopify store to make it look exactly the way you want. It may require some upfront investment, but the benefits can be well worth it.
6. Test Your Online Store
Once you’re sure you’ve completed all the groundwork for your eCommerce business, it’s time to test your website out!
Testing is important as glitchy stores will deter potential customers. The best way to test your store is to pretend you’re a customer and complete the following:
- Browse through your pages, testing that your menus work and that your featured product sections link to the correct collections.
- Set up a test order to make sure your checkout process runs smoothly. This is one of the most important steps as hiccups such as incorrect product cost, faulty shipping options, failed payment gateways, and tedious contact forms will ruin the eCommerce journey and end up in a ton of lost revenue. We recommend testing a successful order as well as a failed/abandoned order.
- Test out your order fulfillment processes including partially fulfilling orders and archiving successful orders.
- Test your website on mobile devices to make sure it is fully optimized.
- Take a peek at your search engine listing preview to make sure that your website appears correctly in the search engine results.
As a business owner, it is always a good idea to step into your customers’ shoes to make sure their experience is a great one and that there are no snags in the sales process.
If you are happy with the way your store looks and that everything is running smoothly, then go ahead and remove your online password to allow customers access to your store.
Step 7: Launch your store
Voila!
Your Shopify store is now ready to launch. It’s important to remember that your store doesn’t have to be perfect right out of the gate. You can always make changes and optimizations over time as you gather data and customer feedback. Here are a few steps you can take after launching your store:
- Market your store: Start promoting your store on social media platforms like Facebook, Instagram, and Twitter. Reach out to potential customers in online communities and forums related to your niche.
- Optimize your store: Use analytics tools to track the performance of your store and identify areas that need improvement. For example, you might notice that your checkout process is causing customers to abandon their carts, or that your product descriptions aren’t converting as well as you’d like.
- Keep your store up-to-date: Regularly update your inventory and product pages to keep your store fresh and engaging. Keep an eye on industry trends and update your store accordingly to stay competitive.
- Provide excellent customer service: Make sure that you’re responsive to customer inquiries and complaints. Respond to customer reviews and feedback promptly and respectfully.
Launching your store is just the first step in a long journey towards building a successful eCommerce business. With patience, persistence, and a willingness to learn and adapt, you can build a thriving store that generates revenue and brings joy to your customers. Good luck!
What’s Next?
Congratulations on taking the first step towards starting and growing your eCommerce business!
A Shopify store is a great way to reach a wider audience and boost sales.
The easy-to-use platform makes it simple to set up and manage your store, and the built-in marketing tools help you promote your products and reach more customers.
Whether you’re new to eCommerce or looking to expand your existing business, Shopify’s free online courses are a great resource.
The courses cover a range of topics, from setting up your shop to marketing and selling products. They’re designed to be easy to follow and understand, so you can get started right away.
So why not give Shopify a try? Click here to start your 3-day free trial if you haven’t tried Shopify yet.
Happy selling!


